pytorch - 训练技巧
自定义损失函数
- 以函数定义
简单直接1
2
3def my_loss(output, target):
loss = torch.mean((output - target)**2)
return loss - 以类定义
更加常用,继承自nn.Module,可以当成神经网络的一层,使用tensor可以自动求导1
2
3
4
5
6
7
8
9
10
11
12
13
14
15class DiceLoss(nn.Module):
def __init__(self,weight=None,size_average=True):
super(DiceLoss,self).__init__()
def forward(self,inputs,targets,smooth=1):
inputs = F.sigmoid(inputs)
inputs = inputs.view(-1)
targets = targets.view(-1)
intersection = (inputs * targets).sum()
dice = (2.*intersection + smooth)/(inputs.sum() + targets.sum() + smooth)
return 1 - dice
# 使用方法
criterion = DiceLoss()
loss = criterion(input,targets)1
2
3
4
5
6
7
8
9
10
11
12
13
14class DiceBCELoss(nn.Module):
def __init__(self, weight=None, size_average=True):
super(DiceBCELoss, self).__init__()
def forward(self, inputs, targets, smooth=1):
inputs = F.sigmoid(inputs)
inputs = inputs.view(-1)
targets = targets.view(-1)
intersection = (inputs * targets).sum()
dice_loss = 1 - (2.*intersection + smooth)/(inputs.sum() + targets.sum() + smooth)
BCE = F.binary_cross_entropy(inputs, targets, reduction='mean')
Dice_BCE = BCE + dice_loss
return Dice_BCE1
2
3
4
5
6
7
8
9
10
11
12
13
14
15class IoULoss(nn.Module):
def __init__(self, weight=None, size_average=True):
super(IoULoss, self).__init__()
def forward(self, inputs, targets, smooth=1):
inputs = F.sigmoid(inputs)
inputs = inputs.view(-1)
targets = targets.view(-1)
intersection = (inputs * targets).sum()
total = (inputs + targets).sum()
union = total - intersection
IoU = (intersection + smooth)/(union + smooth)
return 1 - IoU1
2
3
4
5
6
7
8
9
10
11
12
13
14
15
16ALPHA = 0.8
GAMMA = 2
class FocalLoss(nn.Module):
def __init__(self, weight=None, size_average=True):
super(FocalLoss, self).__init__()
def forward(self, inputs, targets, alpha=ALPHA, gamma=GAMMA, smooth=1):
inputs = F.sigmoid(inputs)
inputs = inputs.view(-1)
targets = targets.view(-1)
BCE = F.binary_cross_entropy(inputs, targets, reduction='mean')
BCE_EXP = torch.exp(-BCE)
focal_loss = alpha * (1-BCE_EXP)**gamma * BCE
return focal_loss
动态调整学习率
使用scheduler
PyTorch在torch.optim.lr_scheduler封装好了一些动态调整学习率的方法。- lr_scheduler.LambdaLR
- lr_scheduler.MultiplicativeLR
- lr_scheduler.StepLR
- lr_scheduler.MultiStepLR
- lr_scheduler.ExponentialLR
- lr_scheduler.CosineAnnealingLR
- lr_scheduler.ReduceLROnPlateau
- lr_scheduler.CyclicLR
- lr_scheduler.OneCycleLR
- lr_scheduler.CosineAnnealingWarmRestarts
将scheduler.step()放在optimizer.step()后面进行使用。
1
2
3
4
5
6
7
8
9
10
11
12
13
14
15
16# 选择一种优化器
optimizer = torch.optim.Adam(...)
# 选择上面提到的一种或多种动态调整学习率的方法
scheduler1 = torch.optim.lr_scheduler....
scheduler2 = torch.optim.lr_scheduler....
...
schedulern = torch.optim.lr_scheduler....
# 进行训练
for epoch in range(100):
train(...)
validate(...)
optimizer.step()
# 需要在优化器参数更新之后再动态调整学习率
scheduler1.step()
...
schedulern.step()自定义scheduler
1
2
3
4
5
6
7
8
9
10def adjust_learning_rate(optimizer, epoch):
lr = args.lr * (0.1 ** (epoch // 30)) # 学习率每30轮下降为原来的1/10
for param_group in optimizer.param_groups:
param_group['lr'] = lr
optimizer = torch.optim.SGD(model.parameters(),lr = args.lr,momentum = 0.9)
for epoch in range(10):
train(...)
validate(...)
adjust_learning_rate(optimizer,epoch)
模型微调-torchvision
- 模型微调-torchvision
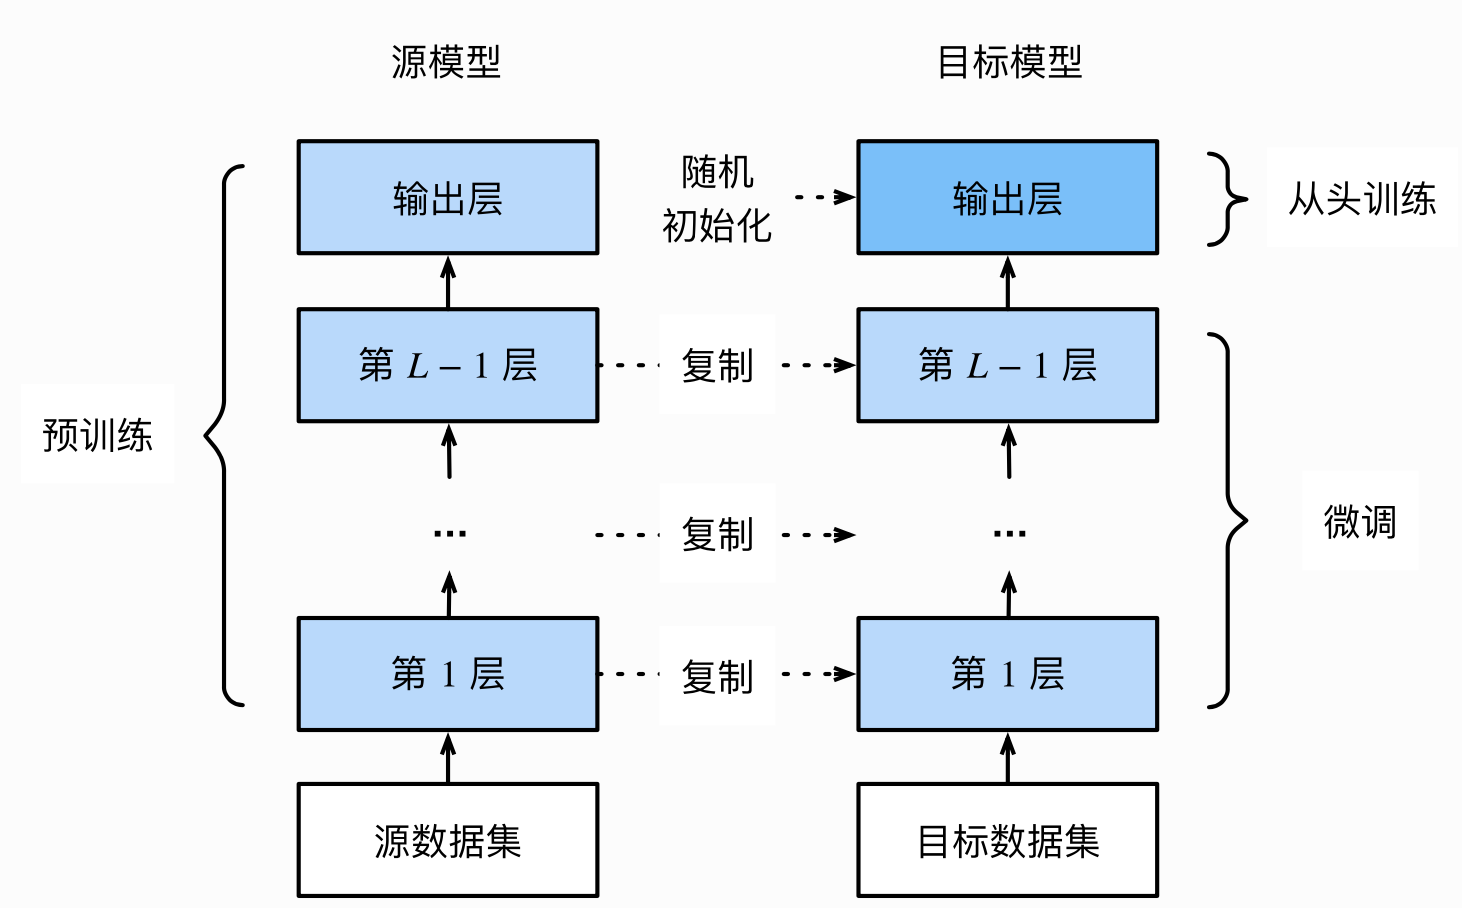
- 在源数据集上预训练一个源模型
- 创建一个新的目标模型,复制源模型除了输出层外的所有结构,其参数学习到了源数据集的知识,假设其同样适用于目标数据集,且源模型输出层和源数据集标签密切相关,所以目标模型不采用它。
- 为目标层添加目标数据集类别个数的输出层,随机初始化模型参数。
- 在目标数据集上训练目标模型,从头训练输出层,其他层参数微调。

- 使用已有模型结构
- 实例化网络
1
2
3
4
5
6
7
8
9
10
11
12
13
14
15
16import torchvision.models as models
resnet18 = models.resnet18()
# resnet18 = models.resnet18(pretrained=False) 等价于与上面的表达式
alexnet = models.alexnet()
vgg16 = models.vgg16()
squeezenet = models.squeezenet1_0()
densenet = models.densenet161()
inception = models.inception_v3()
googlenet = models.googlenet()
shufflenet = models.shufflenet_v2_x1_0()
mobilenet_v2 = models.mobilenet_v2()
mobilenet_v3_large = models.mobilenet_v3_large()
mobilenet_v3_small = models.mobilenet_v3_small()
resnext50_32x4d = models.resnext50_32x4d()
wide_resnet50_2 = models.wide_resnet50_2()
mnasnet = models.mnasnet1_0() - 传递pretrained参数 pytorch模型扩展为.pt .pth,模型权重一旦被下载下次就不需要加载,可以将自己的权重下载下来放到同文件夹下,然后再将参数加载网络。如果中途强行停止下载的话,一定要去对应路径下将权重文件删除干净,要不然可能会报错。
1
2
3
4
5
6
7
8
9
10
11
12
13
14
15import torchvision.models as models
resnet18 = models.resnet18(pretrained=True)
alexnet = models.alexnet(pretrained=True)
squeezenet = models.squeezenet1_0(pretrained=True)
vgg16 = models.vgg16(pretrained=True)
densenet = models.densenet161(pretrained=True)
inception = models.inception_v3(pretrained=True)
googlenet = models.googlenet(pretrained=True)
shufflenet = models.shufflenet_v2_x1_0(pretrained=True)
mobilenet_v2 = models.mobilenet_v2(pretrained=True)
mobilenet_v3_large = models.mobilenet_v3_large(pretrained=True)
mobilenet_v3_small = models.mobilenet_v3_small(pretrained=True)
resnext50_32x4d = models.resnext50_32x4d(pretrained=True)
wide_resnet50_2 = models.wide_resnet50_2(pretrained=True)
mnasnet = models.mnasnet1_0(pretrained=True)1
2self.model = models.resnet50(pretrained=False)
self.model.load_state_dict(torch.load('./model/resnet50-19c8e357.pth'))
- 实例化网络
- 训练特定层
如果我们正在提取特征并且只想为新初始化的层计算梯度,其他参数不进行改变。那我们就需要通过设置requires_grad = False来冻结部分层。之后在训练过程中,model仍会进行梯度回传,但是参数更新则只会发生在fc层。1
2
3
4
5
6
7
8
9
10
11
12
13def set_parameter_requires_grad(model, feature_extracting):
if feature_extracting:
for param in model.parameters():
param.requires_grad = False
import torchvision.models as models
# 冻结参数的梯度
feature_extract = True
model = models.resnet18(pretrained=True)
set_parameter_requires_grad(model, feature_extract)
# 修改模型
num_ftrs = model.fc.in_features
model.fc = nn.Linear(in_features=num_ftrs, out_features=4, bias=True)
模型微调 - timm
torchvision的扩充版本
- 查看预训练模型种类
1
2
3
4
5
6
7
8
9
10
11import timm
avail_pretrained_models = timm.list_models(pretrained=True)
len(avail_pretrained_models)
# 模糊查询
all_densnet_models = timm.list_models("*densenet*")
all_densnet_models
# 查看模型参数
model = timm.create_model('resnet34',num_classes=10,pretrained=True)
model.default_cfg - 使用和修改预训练模型
通过timm.create_model()的方法来进行模型的创建,传入参数pretrained=True,来使用预训练模型。1
2
3
4
5
6
7
8
9
10
11
12
13
14
15
16
17
18
19
20
21
22import timm
import torch
model = timm.create_model('resnet34',pretrained=True)
x = torch.randn(1,3,224,224)
output = model(x)
output.shape
# 查看某一层模型参数
model = timm.create_model('resnet34',pretrained=True)
list(dict(model.named_children())['conv1'].parameters())
# 修改模型
model = timm.create_model('resnet34',num_classes=10,pretrained=True)
x = torch.randn(1,3,224,224)
output = model(x)
output.shape
# 改变输入通道数
model = timm.create_model('resnet34',num_classes=10,pretrained=True,in_chans=1)
x = torch.randn(1,1,224,224)
output = model(x) - 模型保存
1
2torch.save(model.state_dict(),'./checkpoint/timm_model.pth')
model.load_state_dict(torch.load('./checkpoint/timm_model.pth'))
半精度训练
GPU的性能主要分为两部分:算力和显存,前者决定了显卡计算的速度,后者则决定了显卡可以同时放入多少数据用于计算。在可以使用的显存数量一定的情况下,每次训练能够加载的数据更多(也就是batch size更大),则也可以提高训练效率。另外,有时候数据本身也比较大(比如3D图像、视频等),显存较小的情况下可能甚至batch size为1的情况都无法实现。因此,合理使用显存也就显得十分重要。
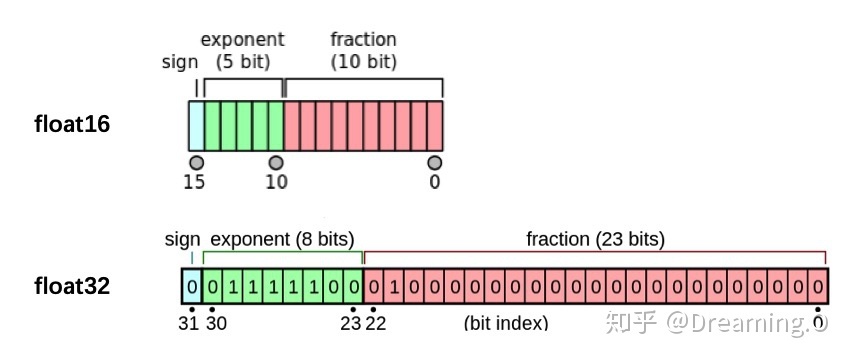
我们观察PyTorch默认的浮点数存储方式用的是torch.float32,小数点后位数更多固然能保证数据的精确性,但绝大多数场景其实并不需要这么精确,只保留一半的信息也不会影响结果,也就是使用torch.float16格式。由于数位减了一半,因此被称为“半精度”。显然半精度能够减少显存占用,使得显卡可以同时加载更多数据进行计算。
- 半精度训练的设置
import autocast在模型定义中,使用python的装饰器方法,用autocast装饰模型中的forward函数。1
from torch.cuda.amp import autocast
在训练过程中,只需在将数据输入模型及其之后的部分放入“with autocast():“即可:1
2
3
4
def forward(self, x):
...
return x1
2
3
4
5for x in train_loader:
x = x.cuda()
with autocast():
output = model(x)
...
数据增强-imgaug
- 单张图片处理imgaug包含了许多从Augmenter继承的数据增强的操作
1
2
3
4
5
6
7
8
9
10
11
12
13
14import imageio
import imgaug as ia
%matplotlib inline
# 图片的读取
img = imageio.imread("./Lenna.jpg")
# 使用Image进行读取
# img = Image.open("./Lenna.jpg")
# image = np.array(img)
# ia.imshow(image)
# 可视化图片
ia.imshow(img)对一张图片做多种数据增强处理1
2
3
4
5
6
7
8
9from imgaug import augmenters as iaa
# 设置随机数种子
ia.seed(4)
# 实例化方法
rotate = iaa.Affine(rotate=(-4,45))
img_aug = rotate(image=img)
ia.imshow(img_aug)1
2
3
4
5
6
7
8
9
10
11
12
13
14iaa.Sequential(children=None, # Augmenter集合
random_order=False, # 是否对每个batch使用不同顺序的Augmenter list
name=None,
deterministic=False,
random_state=None)
# 构建处理序列
aug_seq = iaa.Sequential([
iaa.Affine(rotate=(-25,25)),
iaa.AdditiveGaussianNoise(scale=(10,60)),
iaa.Crop(percent=(0,0.2))
])
# 对图片进行处理,image不可以省略,也不能写成images
image_aug = aug_seq(image=img)
ia.imshow(image_aug) - 对批次图片进行处理
对批次的图片以同一种方式处理1
2
3
4
5
6
7
8
9
10
11
12
13
14
15
16
17
18
19
20
21
22
23
24
25
26
27
28
29
30
31
32
33
34
35
36
37
38
39
40
41
42
43
44
45
46
47
48
49
50
51
52images = [img,img,img,img,]
images_aug = rotate(images=images)
ia.imshow(np.hstack(images_aug))
# 对批次图片进行多种增强
aug_seq = iaa.Sequential([
iaa.Affine(rotate=(-25, 25)),
iaa.AdditiveGaussianNoise(scale=(10, 60)),
iaa.Crop(percent=(0, 0.2))
])
# 传入时需要指明是images参数
images_aug = aug_seq.augment_images(images = images)
#images_aug = aug_seq(images = images)
ia.imshow(np.hstack(images_aug))
# 对批次的图片分部分处理
iaa.Sometimes(p=0.5, # 代表划分比例
then_list=None, # Augmenter集合。p概率的图片进行变换的Augmenters。
else_list=None, #1-p概率的图片会被进行变换的Augmenters。注意变换的图片应用的Augmenter只能是then_list或者else_list中的一个。
name=None,
deterministic=False,
random_state=None)
# 对不同大小的图片进行处理
# 构建pipline
seq = iaa.Sequential([
iaa.CropAndPad(percent=(-0.2, 0.2), pad_mode="edge"), # crop and pad images
iaa.AddToHueAndSaturation((-60, 60)), # change their color
iaa.ElasticTransformation(alpha=90, sigma=9), # water-like effect
iaa.Cutout() # replace one squared area within the image by a constant intensity value
], random_order=True)
# 加载不同大小的图片
images_different_sizes = [
imageio.imread("https://upload.wikimedia.org/wikipedia/commons/e/ed/BRACHYLAGUS_IDAHOENSIS.jpg"),
imageio.imread("https://upload.wikimedia.org/wikipedia/commons/c/c9/Southern_swamp_rabbit_baby.jpg"),
imageio.imread("https://upload.wikimedia.org/wikipedia/commons/9/9f/Lower_Keys_marsh_rabbit.jpg")
]
# 对图片进行增强
images_aug = seq(images=images_different_sizes)
# 可视化结果
print("Image 0 (input shape: %s, output shape: %s)" % (images_different_sizes[0].shape, images_aug[0].shape))
ia.imshow(np.hstack([images_different_sizes[0], images_aug[0]]))
print("Image 1 (input shape: %s, output shape: %s)" % (images_different_sizes[1].shape, images_aug[1].shape))
ia.imshow(np.hstack([images_different_sizes[1], images_aug[1]]))
print("Image 2 (input shape: %s, output shape: %s)" % (images_different_sizes[2].shape, images_aug[2].shape))
ia.imshow(np.hstack([images_different_sizes[2], images_aug[2]]))
使用argparse进行调参
直接在命令行中就可以向程序中传入参数。我们可以使用python file.py来运行python文件。而argparse的作用就是将命令行传入的其他参数进行解析、保存和使用。在使用argparse后,我们在命令行输入的参数就可以以这种形式python file.py –lr 1e-4 –batch_size 32来完成对常见超参数的设置。
argparse的使用
1 | # demo.py |
输入python demo.py –lr 3e-4 –batch_size 32,得到:
This is some output
learning rate: 3e-4
更加高效使用argparse修改超参数
为了使代码更加简洁和模块化,我一般会将有关超参数的操作写在config.py,然后在train.py或者其他文件导入就可以。
1 | import argparse |
随后在train.py等其他文件,我们就可以使用下面的这样的结构来调用参数。
1 | # 导入必要库 |
参考资料
pytorch - 训练技巧

